Monday, September 19, 2011

Heavy question for a Monday

I'll have an AAR to post later this week of the Blood and Jungle scenario Shenam Pass, but in the meantime, this has been bugging me.

In ASL, a squad has an Inherent Portage Capacity of 3PP. A half squad ALSO has an IPC of 3PP. In my experience, ten guys can usually carry more than five guys. What the hell gives, ASL?

Thursday, September 15, 2011

AAR FT159 Tangled at Tsangkou

Had a chance on Labor Day to play JR in this 10 turn beast from LFT. This one takes place in Nov 1945, as hostilities are heating back up between the Chinese Nationalists and the Reds. The GMD has a total of (including reinforcements) 38 squads and two armored trucks with which to dislodge 24 Communist squads from proximity to a rail line that runs across the width of three boards. The GMD also have to remove at least one of the two roadblocks that block the rails.

We had some doubts about the VC which state:
"The GMD wins at game end if at least one Roadblock has been removed and there is no Good Order non-HIP Red Chinese MMC <=2 hexes of any railroad hex. "
As JR pointed out, the term "non-HIP" is really meaningless, as a HIP unit could simply drop HIP in the last CCPh. So, we checked their site which lists an erratum for the VC. The erratum uses the phrase "non-HIP/non-crew MMC." The only HIP the Reds get is their three HIP gun crews, so the phrase "non-HIP" could really be deleted. Otherwise, the erratum makes perfect sense (although the assertion on that page that "This is not really an errata" is a little silly.)

 Anyway, it was easy enough to sort out, and away we went.

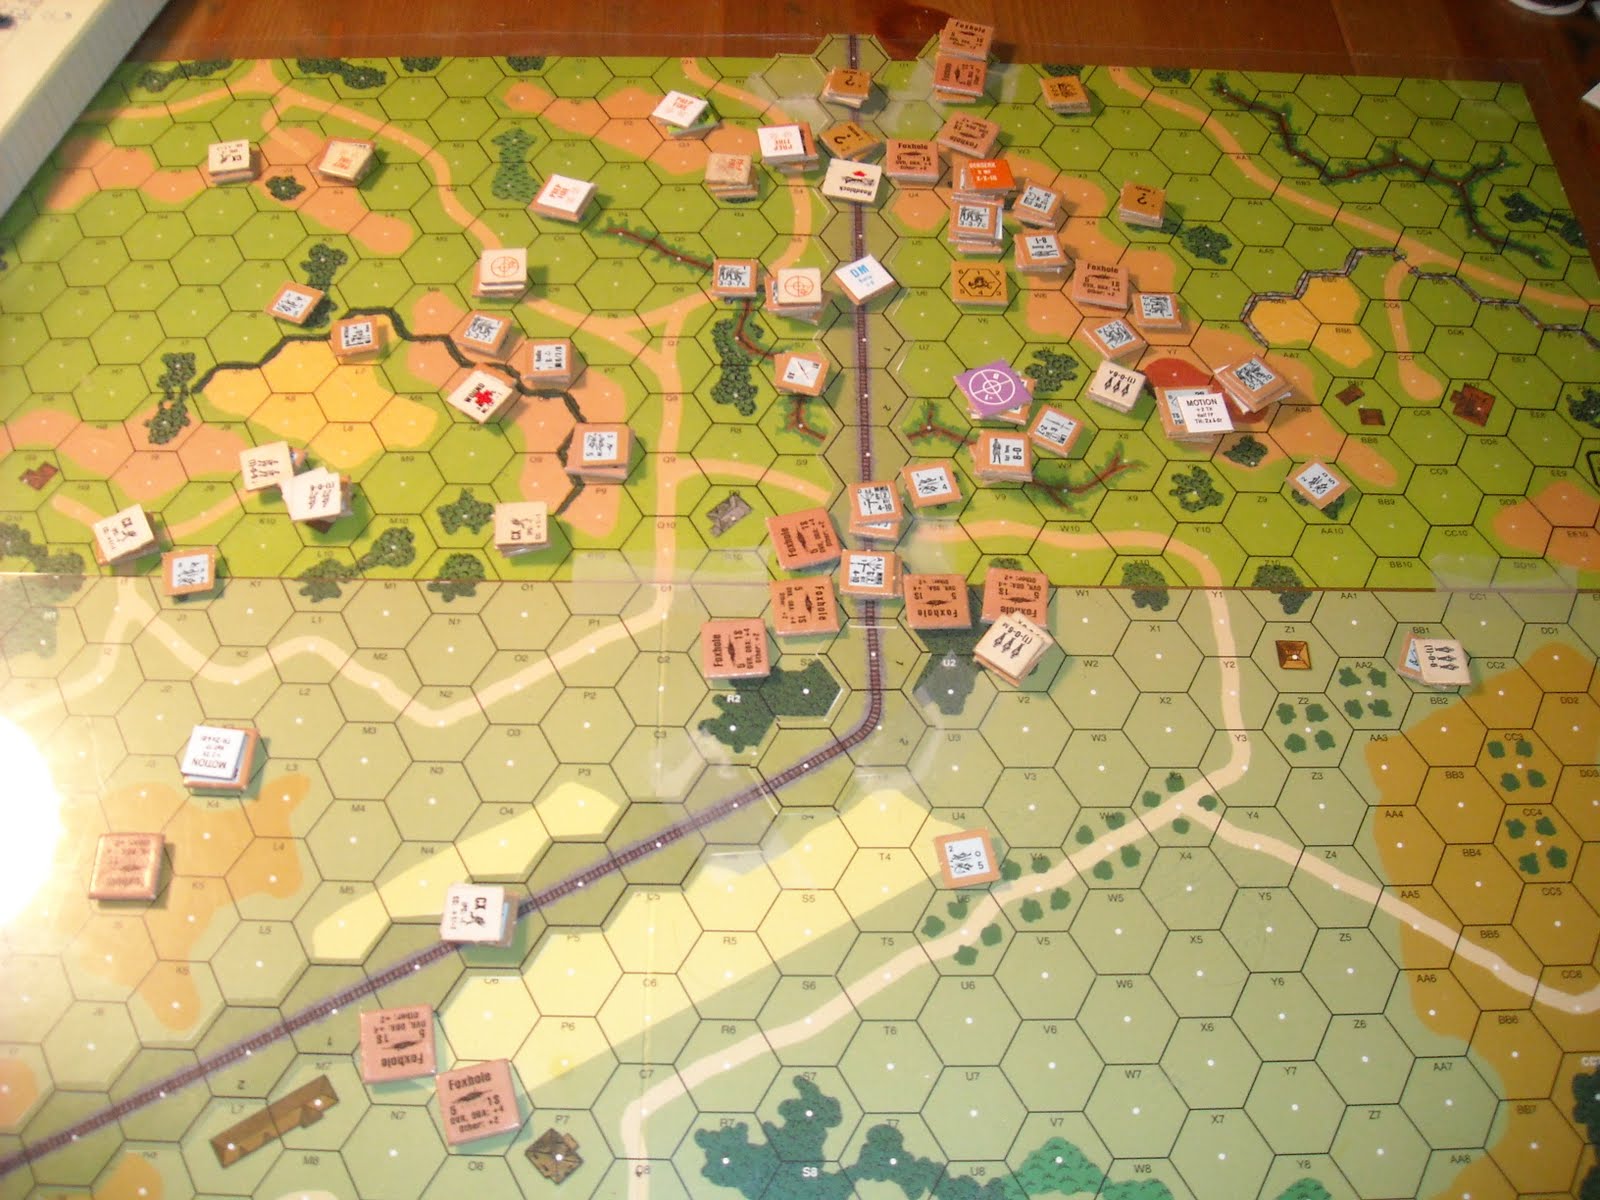
JR had his forward units set up mostly in and around the woods and grain (in-season by SSR) in the center of board V. There were a few units out protecting the flanks which turned out to be mostly dummies. My first objective was to grab the two 2-level buildings on board V to get a platform for my radio man and my MGs.

The Communist 82mm Mtr was set up on the northern heights of board 18, as was the 50mm LtMtr. They had a commanding view of the area and were causing big trouble until my LtMtr scored a CH on the 82, knocking it and it's crew out of the war.

We spotted the first roadblock in a likely location: the woods cluster at the northern edge of board V. A great spot to bring down the artillery! So, my radio man got into position and.....failed contact. Then was killed by a sniper shortly thereafter. Great. Just great.


   JR, meanwhile, was busy digging foxholes and building his last stand location at the very northern edge of the map near the rail hexes. As his reinforcements entered, they mainly took up position in the same area and did some some digging of their own.

  The GMD kept pressing forward and soon were taking a lot of prisoners. Mid-game I got my Mtr/armored truck reinforcement group. The AFVs moved straight up the main road while the trucks bearing the mortars moved up either flank looking for a spot to set up.  I was able to recover the radio and carry it forward with the attack.

 Now however, a crisis was developing. The Red sniper managed to break one of my Guard half squads, giving the prisoners an opportunity to attack. They killed the guard, and before I knew it they were gaining concealment in a building in the rear, close enough to the tracks to win the game. Fortunately, there was still a lot of time left. But it forced me to divert my 9-1 plus a truckload of follow on infantry reinforcements to deal with it.

The other three truckloads moved up the main road to get into position for the final assault. JR got his Taczanka reinforcements and moved them into position to backstop his fallback defense.


  After the woods cluster fell, the two Red ART guns appeared and opened fire. They were both west of the tracks, in position to rake any troops moving across the open ground and bare hilltops. I had a fair number of troops on my left flank which I would use to bring the guns under threat.  Meanwhile a stck in the center cleared a roadblock, fulfilling the easier of the two victory conditions.


  As the game end neared, the ART guns had been dealt with, and my main thrust was coming across the eastern hill. I FINALLY got one of my large mortars in position and set up, so naturally I rolled a 12 on it's first attempt. I had the radio in position to do something as well.

  I had lost one of my AFVs to LtMtr fire, but the other was still rolling about.


There were three potential game winners for the Reds, and I needed to get them all at least into melee. (one of the circled foxholes contains a crew, and so was not a potential game winner. Not thinking, I attacked there anyway. ) The radio man went to work and dropped smoke all around the Red Alamo. We charged.

   The surviving AFV passed all it's checks and drove into the northernmost foxhole hex. The troops attacked and destroyed it, but obviously lost concealment in the process. The rest of my troops moved up through the smoke and bump-scouted any remaining concealments to eliminate the possibility of Ambush. We moved into CC with advantage in each location, and the GMD pull out a final turn victory.


   It's a long hard slog of a scenario, but still interesting and entertaining. The early loss of the 82* really hurt the Communists. The terrain to be crossed doesn't give much cover from that commanding position. My own humble estimate is that it's probably a little pro-GMD, but not too far off.

 In preparing for this scenario, I envisioned that having 38 Chinese squads would bring about the opportunity for at least one if not 3-4 Human Waves. But the wide open spread-out nature of the battle made that ability moot. 

  I also dutifully noted where my Dare-Death squads were, but did not voluntarily Berzerk any of them, and was able to use their H-T-H CC feature only one time.

   You know what they say about plans and first contact and all that..... 

_________________________________________________________________________________

On a side note, it seems that in ASL terms, a Taczanka has an inherent crew, and also a Passenger crew which fires the MG. We decided that these vehicles must be the result of some old-timey college pranks, because.........uh......


....getting ten men into that thing doesn't seem likely.........


Thursday, September 8, 2011

The Ravine

Got in two good, tense games this past weekend. On Saturday I played Jim in Operation Watchtower's The Ravine, a scenario that's been on my list for quite a while. Monday, I played JR in a large LFT scenario he chose titled Tangled at Tsangkou. More on that in a future post.

  The Ravine takes place on Guadalcanal in November 1942. 24 Marine squads (including reinforcements) are tasked with taking at least 6 level 2 hill hexes from half as many well-fortified Japanese squads, without suffering 20CVP or more. The Americans also have a 100+ artillery module that uses a subset of the NOBA rules.

  There are two level two hill hexes on the eastern side of the battlefield, and a large hill mass on the western side with fourteen of them. The first tactical decision for each side happens before the first die roll: What do you do with the two hexes in the east?  As a Japanese defender, I was tempted to abandon them, and concentrate my forces on holding the bigger prize. In the end, I decided to put a token on-board force plus a few HIP squads on that side to try to cause a few casualties should Jim decide that it looked too easy to pass up.

  Jim decided not to tempt fate on that side. He concentrated his entire force on the big hill. I would pull 2 squads off the western hill to help defend the east, but keep my HIP squads in place until his turn three reinforcements entered, just in case. I think that little poker game worked to Jim's advantage.

  Turn two, the Marines have dropped smoke on the hill, and are pushing through the jungle.


     The western approach to the hill, where the path cuts the jungle, appeared to me the most logical approach. That's where I put three of my six Panji hex sides, and the MMG crew (with an escape tunnel back the pillbox on the rear of the hill.) This was fairly a effective defense, as the troops trying move up this side made only a little progress.

   I also made a blunder here. I had one of my large mortars set up in the bamboo of R1, just waiting for some Americans to move into X1. When I revealed it and went fire Jim objected, pointing out that Bamboo is treated like Dense Jungle, and you can not fire a mortar from Dense Jungle. ARRG! So, I packed it up and moved it one hex. It would get a lucky rate run and kill a USMC squad, but otherwise had no impact on the game.

    What I didn't count on was a large force squeezing through from the other side. I had one Panji trap in the jungle on the board edge which served only to slow down the attack. Pretty soon, I had a large force pushing up the eastern slope, and a squad or two getting all the way around to the rear.

   By this point the Marines had lost about 8CVP, mostly to long range mortar fire and close combat. It was starting to look like the Japanese would have to get the CVP cap if they were going to win.


    Soon, I was rolling up a mild breeze which caused some major smoke density on the hill top. Now, there were almost no shots to be taken, as the lines of sight became few in the drifting smoke. I attempted a half-hearted and somewhat pathetic Banzai charge with a leader and a half squad up the rear slope. It was short lived.


  Late in the game, I managed to kill the 2nd radio man with long range mortar fire, and the smoke eventually cleared. Now the marines were consolidating their position, with little to no cover. My mortar on the opposite hill was now able to bring fire on the marines on the hill top and the CVP was getting very close. Jim chose to voluntarily break some of the troops on the western approach, rather that risk a CC that might win me the game.

  As the last half of the final turn came, the Marines held 7 victory hexes. One of those was undefended, and would be taken back easily. The others were stacked waist deep with Leathernecks. However, the Marines stood at 19CVP. Just one more would wrap it up. When a rally attempt came up boxcars, it would give the game to the Japanese. An anti-climactic ending to be sure, but I'll take it.


   Jim and I both agreed that is a very strong scenario. Both sides face tough choices. Also: Panjis!. We both gave it a '7' on the ROAR 1-9 scale.


Sunday, September 4, 2011

Interlude -Go See Ted Leo.


This song always makes me think of ASL: Even Heroes Have To Die.


Friday, September 2, 2011

Brackin Bash

   Got to attend the annual Brackin Bash ASL event a few weeks back, always a fun time. There were eight in attendance including our host. I got in two close games, and lost them both.
 

Under Murderous Fire


  For my first match I played "Under Murderous Fire" from VotG against Rob Schoenen. I had the Russians, and thought I might try to surprise Rob with a little sewer movement. I sent two squads and the 7-0 underground in turn two, planning to come up in the cellar of the building just east of the Milchaus on turn four, and really give the Germans a headache.

 Naturally, they got lost at the start of turn three. Rob moved them right back where they started. I was able to get them out of the sewer in the APh, and called it quits on that idea. I couldn't afford to risk having them out of the game entirely.

  My main thrust up the southern side made some progress, but ran into a brick wall just before the Milchaus. Rob had mined the southern approached and (obviously) used one of his Fortified locations there.

   Meanwhile my smaller feint on the north side made good progress. Fire from the Russian HMG helped three squads take apart the token German resistance there. Finally, with the last rush in the top of the final turn, I was able to take a 7th vp location. This forced the game to the bottom of the turn for the German counterattack.

   When one of my vp holding squads was broken by snake eyes on a shot from the German HMG, the game was all but over. He would be forced to rout, and the Germans would advance in to take the location back for the win.

   Top-notch scenario. Would play either side.


Easy Day at Volupai


   Later, I got to play Andy "Cholm" Hershey who made the long trip from Virginia for the event. We played FT141, Easy Day at Volupai. This is a PTO scenario set on New Britain. Andy's Marines would basically have to annihilate my defending Japanese. This is your basic bug-hunt scenario.

    I HIPped my .50-cal/9-1 in some bamboo and set up a forward line of concealed units, trying to slow the Marine advance. Andy moved forward methodically searching for the concealed Japanese units.

   As the advance moved on my .50cal popped up and fired, then advanced behind the bamboo into a waiting foxhole, setting up a reverse slope position.

  In the end however, Andy's USMC just had too much firepower and wore the Japanese down before finally breaking the half squad I needed with a large Fire Group in the Advancing Fire phase of the final turn.

  It's a fun enough little PTO scenario that plays pretty quickly, but the bug-hunt nature of it plus the tilted early ROAR results (7-1 pro-American) means I would likely not play it again. 

  It's a little heartbreaking to lose two close ones, but the good beer and hoagies help to ease my pain.