Sunday, September 1, 2013

Ear Worm

I've been walking around this morning humming "Festung Budapest" to the tune of Eric Clapton's "Mainline Florida." I should probably be on some kind of medication for that.

Wednesday, August 7, 2013

FB 15 The Taking of Object 59 AAR

   My opponent, Jim, and I sat down for trip into Budapest. This time we picked out FB 15: The Taking Of Object 59. This is one of the meatier scenarios from Festung Budapest, but still entirely manageable. (Jim and I knocked it out in a tidy 6-1/2 hours.)

    The Russians, with some help from the Buda Volunteer Regiment, need to either capture three buildings on the German left, or the "Object 59" of the title, the Southern Railway Station. They've got a pretty tough and well equipped force of nearly twenty 1st line and elite squads and four T-34s. They've also got two big artillery pieces on map plus battalion mortar OBA.

   The defending Germans have ten SS squads, half a dozen Hungarian squads, two guns and some ad-hoc armor support. The Germans also have some pretty serious ammo shortage, fuel shortage, and food shortage limitations. But mostly they have good defensive terrain in the rubbled city.

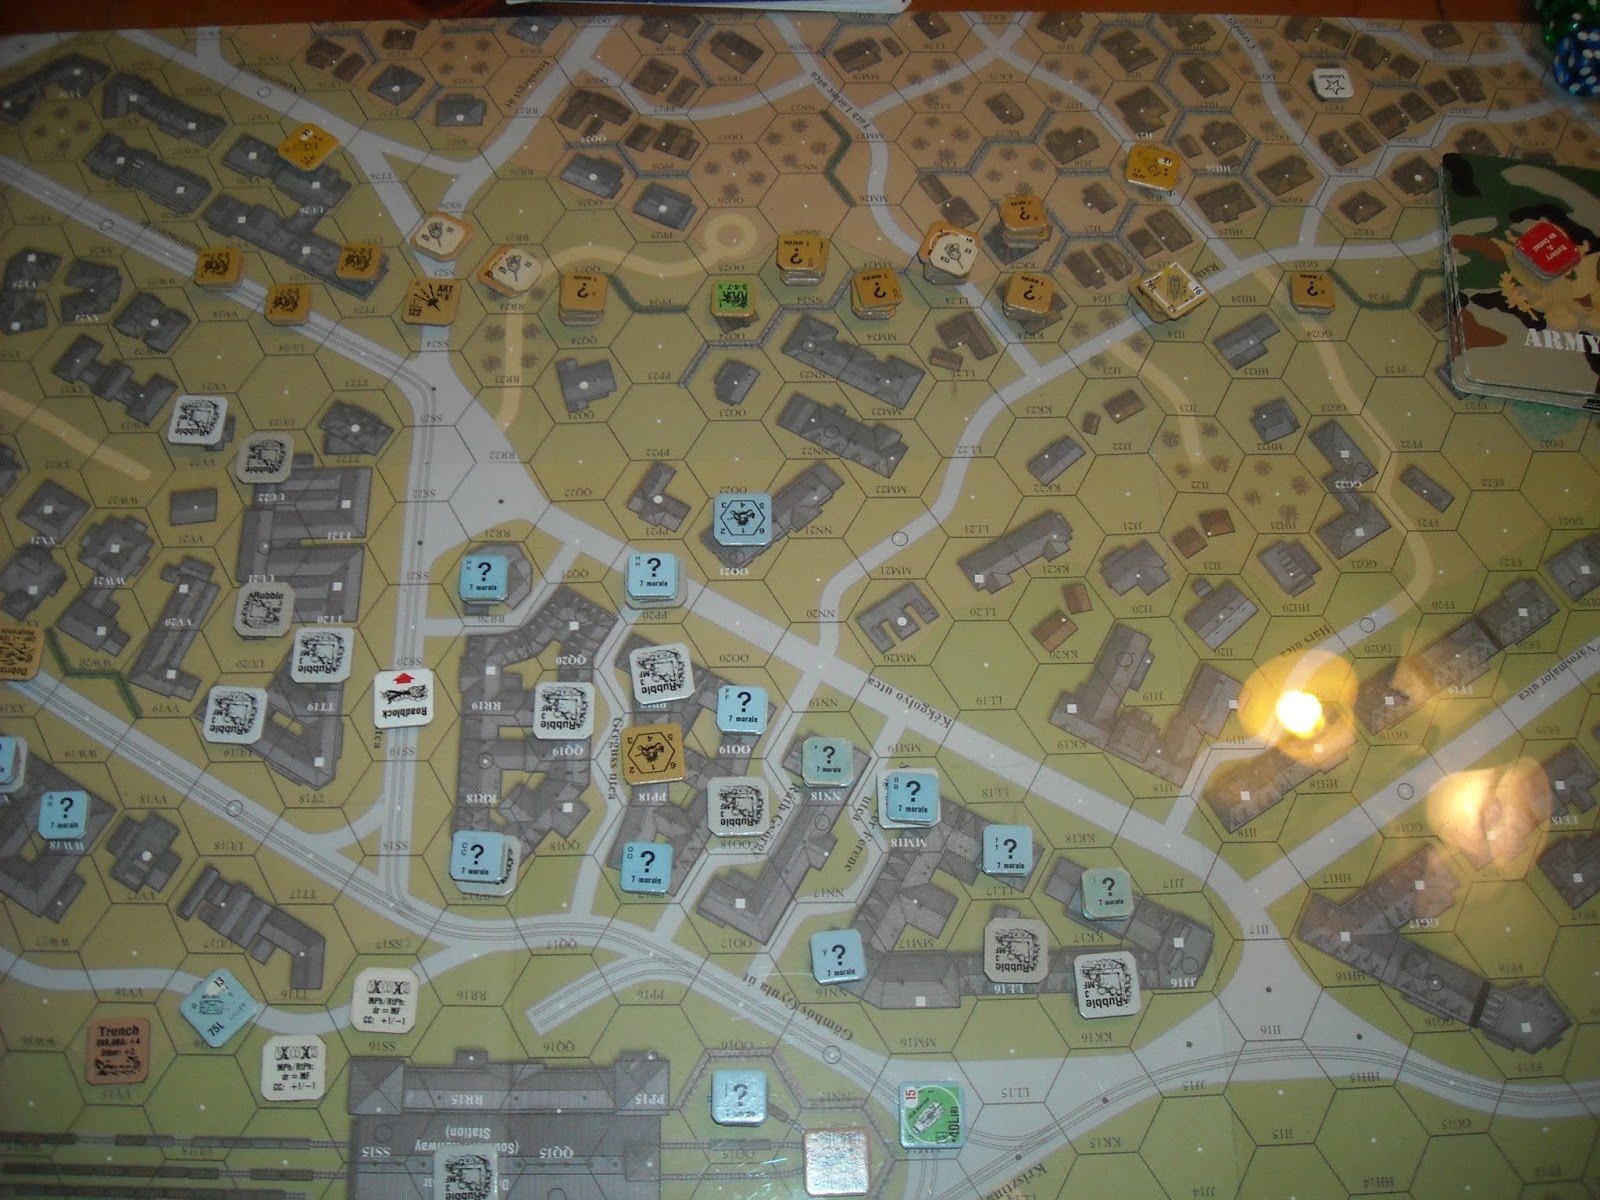
   I set up the Hungarians on my left flank, backed up by the Zrinyi overlooking the crest line behind them. The SS went on my right. The infantry giving ground at start, setting up 4-5 hexes behind their limit.  The food shortage has the effect of making double time N/A, and I was worried about my ability to fall back.

    I had a HIP schrek toting half squad in the cellar of JJ16 (corner property), and another with the DC on the 2nd level of MM16, hoping to get a chance to toss the demo charge at a passing tank. I was keeping my armor protected in the rear for now.

    Jim set up mostly on my right, opposite the SS.


       Jim used his big guns to fire on the center roadblock. The rubble and roadblocks really constrict tank movement, and getting a roadblock out of the way opens it up a lot. Other than that and possibly firing smoke, it's hard to know what else to do with those guns. They come with trucks to tow them forward, but that is some pretty high risk driving. Leave it to a professional, on a closed course.

      No big surprises through the first few turns. The Russians ground forward as the Germans fell back. At one point, near the center, I got a little aggressive in moving a squad forward  into CC. I was hoping to win the CC and be rewarded by picking up the Russian .50 cal left behind by a squad who routed away. Instead we had a melee, which Jim fired a T-34 into next turn, breaking my squad and leaving his not only unharmed, but frankly even feeling pretty good about things.


 I pulled most of my Hungarian squads back and started moving for the station that Jim was obviously going for. It was still early enough that i didn't feel comfortable selling out completely. I tried to move the Zrinyi into a better spot, but rolled up an empty gas tank. It's war was over.

   Jim kept his Russians grinding forward and moved a T-34 to challenge my Panzer IV which was holding up the right.

   I foolishly kept my HIP schrek boys hidden trusting the tankers to handle it. They whiffed and payed for it with an APCR round right through the turret. The Nimrod a few hexes away never had a prayer. I moved my Panzerschrek team up to the ground floor looking for a better shot. They took some fire and generated a hero who took over Panzerchrek operations. In advancing fire he burned the T-34 on his first shot, but the backblast killed him and the half squad. Still, a halfie for a T-34 is a trade I will make.

Jim blew up the center roadblock and redirected two tanks up Broadway. They took out the Hetzer which had retreated into the station.

He tried to tow his guns up to a better location, but the lead one was taken out by small arms fire, and the second one couldn't find a safe way forward.   

We settled in for the endgame. Jim had his kill stack in the rubble of RR17 and his radio man next door calling down artillery requests.

    I revealed my 75* infantry gun in the fortified 2nd level location  of VV12, with good LOS over the station to the buildings opposite, and a few street locations as well.

    I had managed to get about 5-6 squads back into the station, and spread them out. During the next turns, those squads skulked back and forth until the battalion mortar fire came down and kept us out of the forward hexes. Jim got some troops into the walled area east of the station, and we were set for an exciting last few turns.

     Jim canceled his fire mission to give his troops a chance to cross the street. My fourth fortified location was in the northwest corner of the station. The Hungarian squad there stood up to all the fire the Russians could dish out, but finally broke when Jim sent a T-34  crashing in and overrunning in the last turn charge.

     A second T-34 moved through the station to try to overrun another squad. Squads nearby took two panzerfaust shots at it, missing both, before finally connecting and burning it on the third.  At that point Jim conceded, as he just didn't have enough troops to reach all the hexes he needed.


      Jim and I both really dug this city brawl. It could have very easily gone the other way. I was pretty circumspect in choosing my shots keeping the ammo shortage in mind. A few squads were reduced, but none went all the way to conscript, and all of my MGs stayed in working order until the 6th turn. The food shortage makes the SS supermen a little less super, reducing their broken side morale, but it's still an eight! Hard to complain too much about that.

      I had previously played two FB scenarios, and liked them just fine, but this one really does seem a cut above.  Based on this playing, I hope to play a few more Budapest scenarios in the near future.

(Note: Also check out Ian's AAR here)


Tuesday, July 30, 2013

AP 75 Gabriel's Horn AAR

   After my drubbing in Cat's Cradle, I was eager to get back to the table. I think is probably due to a highly developed self loathing or some brain malfunction. In any case, we settled on this Action Pack 8 scenario.

    This one has a clearly superior German force attacking Texas National guardsmen dug in on a hill and neighboring village. The American troops are a mix of 1st liners and green troops, with a low ELR (2). The Germans are a well armed company with four Stugs in armor support.

    The problem the German side has is that they have a lot to do. They need to capture all level three hill hexes, four of the seven 3 hex buildings in the village, and double the Americans  CVP total.

    The American hill set up gives a lot of options. Do you play for time and set up as far east as possible keeping the German force attacking the hill far from the village? I can certainly see the argument for it. I went the other way, hoping to support my troops on the hill with fire from the village slopes. The hill peaks on the western side also provide for better fields of fire down the slopes of the hill.

    Jim jumped off his attack aggressively. His troops had a lot to do, and he wasn't wasting any time. He brought his artillery down on a well chosen pre-registered hex. The initial mission wasn't too bad on the T-Patchers, but there were many more to come.

    After some ineffective prep fire from two MG kill stacks, his troops started getting right up in the American's faces. We were able to beat back most of the initial advances with mortar and point blank small arms fire. Jim took a few casualties, then took a few more with some unfortunately timed boxcars causing casualty MC and Fate results.

    Meanwhile I moved my two mortar teams in the village out to find positions to fire on the hill. They were both broken by MG fire and routed away without their weapons. So much for supporting fire for the hill defense. .

   Jim moved a few squads into the village and grabbed up the southern victory buildings, which I was not contesting.Those squads would then sit tight and wait for help to arrive.

    Over the next few turns, the German artillery and firepower took it's toll on the Americans. The Stugs entered and added even more power to the German punch. The multi-directional German attack causes obvious routing problems, and soon the Germans were burdened with a lot of prisoners. With the CVP situation already looking grim for the Germans, and prisoners counting for double, the Germans would not be declaring no quarter today. They would be more than happy to take a few more guests back to the Stalag.

    By turn four, the hill had been pretty well cleaned up save for a stubborn MMG toting hero who would hold on for another turn. The German armor began to focus on the village.

    I slipped my bazooka teams down the slope in front of the village, and after holding up to German fire one of them took out a Stug at three hex range. That was a costly loss for Jim. The armor kills (without crew survival) are worth 6 VP each. So for each one lost, the Germans have to score an additional 12(!) CVPs. Losing one makes achieving the VC pretty tough. Losing two makes it close to impossible.
 

    Up the road came another Stug, stopping three hexes from the same bazooka team. When they took it down in my next prep fire phase, it was pretty much game over. In addition, that crew was named the GREATEST BAZOOKA CREW EVER.

   For the Americans, I like defending the western side of the hill, even if it means giving the Germans a bit of a head start towards the village. The Germans in this one will almost certainly get the hill hexes they need for victory. The issue for them is doing it quickly enough to pivot on the village, and doing it all  without taking too many casualties. And of course, protect the armor.

   It's a fun and complex scenario, Jim and I both gave it high marks.
    

Saturday, July 27, 2013

AP 75 Gabriel's Horn

   Heading out in a bit to play the American side in the AP 8 scenario Gabriel's Horn. There are a lot of good resources out there on this scenario.

   There are at least three cool AARs around posted by whineandcheesaslwisconsin, yockbosboardgames, and aslwitchita.

   There's an interesting overview of the depicted battle and the days surrounding it at The Texas Military Museum's website.

   And there's this gamesquad rule question. It refers to a different scenario, but the rule in question is very important to this one.

   Will probably post an AAR here later in the week, or whenever I get done weeping.

Friday, July 26, 2013

Rule of the Day

  Been re-reading the artillery rules to get ready for tomorrow's playing of AP75 Gabriel's Horn. My green Americans will be trying desperately to hang on as the Germans pound away at them. The Germans have 80+ OBA and an offboard observer and...wait...what's this...?
 
"1.63 Offboard Observer. A SSR may give.[edit]. The Final Accuracy dr required for OBA using an Offboard Observer is always <=1 [EXC: Pre-Registered Fire;1.73]. "

  So, even Brit, US, and German artillery is less accurate with an offboard observer calling the shots.  Sure, I'm pretty rusty these days, but I am pretty sure I never knew that. 

Wednesday, July 24, 2013

J154 Cradle to Grave AAR

   My first ASL game in many months went about as well as I could have expected. That is to say, it went really badly.

    Even after spending some time brushing up and analyzing the scenario in blog posts here and here, the rust was still as thick as a ...I don't know a Texas... thing in a...something else. Look, I'm bad at colloquialisms too.

    Jim surprised me by actually contesting the main hill. My eastern group (whom I've dubbed Kampfgruppe Suck) was surprised to find a tank destroyer and a mortar sitting atop it, with the other TD in the grain just south.  The mortar hit a stack of two squads bypassing a board edge woods hex and broke them with the deadly airbursts. Later two of those squads would cr on subsequent hits, a remaining half squad would die off on a fate result, and the leader they were with would go berserk. That was a very costly beat down.

    I moved up a panther and a PZ IV from different angles to engage the TD on the hill. By itself not a terrible idea, but moving them both up inside it's CA was not a championship quality move. I lost the PZ IV in that exchange.

    My panther kept firing at the other (hull down) TD and kept putting round after round into the wall. This TD would eventually successfully disengage and take up a position closer to the town, but not before taking out a halftrack.

   Meanwhile I moved a leader in to CC the TD on the hill despite the fact that his accompanying squad failed their PAATC. He survived the CC and ended up tying down the TD just by staying in the hex. The TD disabled its' MA on an in hex intensive fire shot, and was recalled. But not before breaking the leader in the bottom of the turn, (and eventually killing him for failure to rout.)

   The American machine gunners on the outskirts of the town did a good job of breaking any Germans appearing in their LOS. After three turns, I had achieved the hill, but it was too slow, and at too great a cost.        


   Meanwhile, the group entering from the North (Kamfgruppe Lame) came on board with the infantry moving through the woods, and a panther and a PZ IV skirting them to the east. The infantry encountered a few partisan half squad speed bumps, but no major resistance. They moved through the woods and approached the town through the orchards and grain fields.

   At one point, the panzer IV moved ADJACENT to a partisan squad rather than risk giving a rear shot to a reinforcing American tank and got flamed by a molotov for it's trouble. The panther moved up to engage the well positioned mortar in U4. The panther suffered a shock result, and went out with a whimper rather than a bang, going down via the SHOCK/UK/DEAD route.

  The infantry approaching the northern buildings got HAMMERED. The biggest blow was a 10-2 directed point blank spraying fire shot that wiped two squads from the map. Ugly.


             Back in the east, I managed to get a few squads into the town late game, but never really came close to threatening. The lone highlight of the game for the bad guys was smoking an American tank at long range with a HEAT round from a Hummel on the hilltop. It was like when you stick that 5-iron approach shot 2 feet from the pin from 170 yards out on your way to shooting 140. At least there was one thing to feel good about.

         So, Jim's water's edge defense on the hilltop really surprised me. I still think that's a pretty risky defense, but I failed to adjust and make him pay. In the north, as Jim pointed out, the infantry really need help from the German tanks to close ground and chase the partisans back to the village.

     Still think that this is a really interesting scenario, and would love to try it again sometime when my atrophied skills are a little more toned up.

Tuesday, July 9, 2013

J154 Cradle to Grave

 There will be a longer AAR to follow. Here's the short version:


This is a Panzerkampfwagen V, aka. Panther that was part of the German 11th Panzer Division called the "Ghost Division". This photo was taken at "Place Vaugelas", Meximieux, France after the battle on 31 August- 1 September 1944.

Saturday, July 6, 2013

Battle Planning J154 Cradle to Grave Pt 2 - The Attack

   (I'm typing this post and the previous one in advance of my next game, and scheduling them to be posted during the game, lest my opponent gain any advance intel.)   

  With the 11th Panzer Division turning to fight the pursuing Thunderbirds at Meximieux, the first decision you have to make is how to split your forces. You need to break them into two groups, and each must have at least 6 squad equivalents (of 14 total), 2 SMCs (of 5),  and 2AFVs (of 8). One group enters on the north edge, the other on the east edge on/south of 18M1


(East Edge)
   I decided pretty quickly to max out on the force entering from the East. That'll be 8 squads, including all 4 elite squads, 3 SMCs, and 6 AFVs.  I'll be bringing both Hummels, both halftracks, one Panther and one PZIV on from this direction.

   There are two good reasons for this. One is that it's simply the shortest route to the village. The second is that I want to quickly grab the hills East of town. I don't want to put any open topped vehicles up there until I know where the American mortars are. However, I could see putting a PZIV up there to possibly fire smoke, or a Panther to shoot up the town.

     I could also see putting a half squad up top as a spotter for the mortar halftrack which could remain safely out of sight. (I wasn't entirely sure it was legal to use spotted fire with a mortar halftrack, but found this thread on the Gamesquad Forums indicating that Perry has ruled that it is legal.)

     If I could be reasonably certain is was safe from mortar and TD fire, I'd gladly put a Hummel up there, but I don't expect it to be safe. It is a war, after all. But by entering in force from the east, I hope to sweep up the hills fairly quickly, and move the infantry on into the town.

   The northern troops will have less to work with, and a suitably smaller goal. They will be tasked with grabbing the northernmost stone hexes and keeping the American reinforcements at bay. There is a threat of the HIP partisan MMC popping up late game and retaking previously captured stone hexes to guard against as well.

  Difficult to plan too far in advance, but those are the broad strokes. In addition, whatever plan I make will be quickly abandoned as soon as my first squad breaks and I declare the scenario an unwinable dog. 


Battle Planning Cradle to Grave PT 1 One - Defense

(I'm typing this post and the next one in advance of my next game, and scheduling them to be posted during the game, lest my opponent gain any advance intel.)  

 For my upcoming game of J154 Cradle to Grave, ..I know I said that I can't really try to guess what Jim will do, and it's true he has lots of options, but ...come on. I'm only human.  How can I not take a guess?

  In setting the boards for the first time, I'm taking a look at the allied forces and trying to figure out how I would defend if the tables were turned. First of all comes the optional piece of the Partisan OB. I think you take the dummy counters for sure. In a scenario where keeping Partisans alive is the VC, keeping the Germans shooting at ghosts seems like a no brainer. I think I would also take the 2DCs, giving the Partisans another AT weapon at their disposal (they also have molotovs by SSR.)

   I think you could also make a case for taking the 12 AP minefield factors, although the "building or woods" setup restriction mitigates their potential a bit. The 2 lmg option is ridiculous. The Partisans are already under ammo shortage making the B11 Russian pop-guns even less durable and effective.   

  The Partisan force is allowed to set up as far north as row D, but that seems unwise. The German force is very mobile, and the likelihood of getting cut off and trapped is high. I expect any Partisan stacks placed near the northern side of their setup area will be mostly (if not all) dummies. The real Partisan troops will likely setup as far south as possible and immediately start heading for the town .

(East Edge)
   The American troops in the south have the three level two hill hexes east of the town in their setup area. Those positions, while not dominating, are pretty good. You can see a lot of the town from up there.  However, the initial American force is pretty thin. Again, I can't imagine Jim will try more than a token resistance on those hills. Instead, I expect the Americans to mainly stick to the stone buildings in the town, and employ more of a reverse slope defense on the hills. That might very well  involve some bore sighting by his mortars and tank destroyers on those hilltops.

    The only slam dunk mortar position is 10U4. From there is LOS to at least two of the three level 2 hill tops. In addition there is LOS to some of the woods along possible German approach routes, and two of three stone locations in the northernmost building cluster. Beyond that, I don't have any idea where the 2nd mortar or the two tank destroyers might be. You could make a case for 10 different places, none of them especially good.

  I think the Allies are best off making this into a street fight in the village as quickly as possible. The 5FP and 6FP Amis have a close combat edge in a one-on-one fight, and the partisans have stealth on their side. That kind of fight would mitigate the German armor advantage and maybe get the maquis' molotovs into action in a meaningful way. 

   That's what I expect. I am prepared of course, to be totally wrong. 


Thursday, July 4, 2013

Pre Gaming

Meximieux, France
  With a long holiday weekend on my hands, I'm writing a few quick posts on J154 Cradle To Grave which I am playing on Saturday. I'm writing one post on how I might set up a defense if I had the Allies, another on my plan of attack. Of course, I can't post them, because my opponent, Jim, may stop by the blog at some point before that. (Espionage ain't what it used to be.)

    So, instead, I'll schedule the posts to go up during our game on Saturday. Then at some future point, I'll post an AAR and see how wrong my analysis was. (Spoiler: WAY OFF) I'll grade myself on the stupidity scale with "pretty stupid" at one end, and "face melting dumb" at the other.


Monday, July 1, 2013

Scraping Off The Rust.

  Getting ready to play J154, Cradle to Grave, this weekend. First ASL in many months. I'm probably more excited about it than a 44 year old man should be about playing a game, but here we are.

  Jim chose this one from the short list of suggestions I made, and I was hoping he would pick this one. It's a West Front battle designed by the prolific Pete Shelling. It features a combined arms German attack on a mixed group of first and second line Americans who are joined by 8 squads of French partisans.

    This scenario caught my attention because the more I looked at it, the harder it was for me to imagine how it plays out. I really have almost no idea what will happen in this one. I just know that my attacking Germans have two jobs: capture stone building hexes and kill partisans. 

   The twist is that I have to split my force in two, having some enter on the north edge, and some on the east. I have to do this before seeing the allied defensive setup. That's an interesting challenge, because the defender has a lot of options here. I can't possibly try to guess what Jim will do defensively, I just have to come up with an attack plan that makes sense and be ready to adjust it.

   To make things more interesting, the American turn three reinforcements also come on along the north edge. Four first line squads and two gyro stabilized M5A1s will be running right up the heels of my northern group. 

  Will the slippery partisans evade and frustrate the German attack? Will the American tank destroyers rack up dead Panzers? Or will the big German firepower overwhelm the allies and hold the day? 

  Seriously. Tell me. I have no idea.

Sunday, June 30, 2013

Is This Thing On?

   So. I guess I never really posted an AAR from  that FB game. Looking at the date on that post, I can't believe it's been that long since I played ASL. Fixing that soon.

   I had the defender in HKL259. It's all a bit vague at this point, but I recall the Russian attacking across a wide front, as my troops fell back down the hill. It was about what you'd expect, as the Axis try to slow down the Russian advance, and whittle them down a bit.

  The ammo shortage is very tough on this Axis force, as all those 2nd line troops become conscripts, and the conscripts become, well...

  I remember the endgame coming down to last turn. I was very weak by that point, and just trying to spread out across the goal line. (You can't stop the Russians, you can only hope to contain them!!)  When I say I was "weak," I mean my left flank was being held up by a conscript half squad and a dummy stack. Jim sniffed out the dummy stack, my half squad rolled boxcars on it's one decent shot opportunity.  Game.

   It was a neat tactical puzzle, and I would play it again. Jim's wide attack put pressure on all points of my line and forced me to keep taking shots, which is exactly what the Axis need to try to avoid.