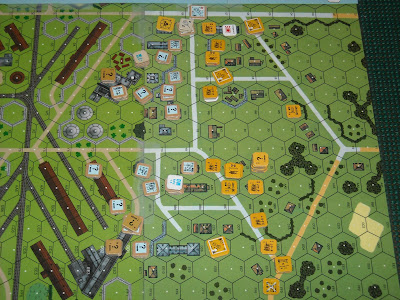
Defensive Set Up Here is how things look before the concealment counters go on and the guns disappear as we await the arrival of the IJA at the edge of Sung Kiang.

The first decision was where to put the guns. I chose S3 and CC1, both on BFP B (the rear board). S3 covers the left flank and the rear of the U1 factory, and most of the critical road. CC1 has a line of site to at least four important buildings on the Japanese route of advance, including the key looking corner property T7 (but no boresighting by SSR. Rats!)
Interestingly hexrow 'Q' is in play. I've given the ATR to a half squad in R6 to guard against a Japanese armored car flank attackup the road. Also countering a quick road move are the two funky Chinese armored cars in the road.
Deciding how far forward to set up was tough. I hate to give up all that ground so easily, but I can't count on any squads set up north of row 6 being around even to midgame, let alone crunch time. So, just a half squad in S4 and a dummy stack in V4 to slow down to the IJA . The obvious first line of defense is the R8-Y8-EE5 road. If all goes as planned we'll duke it out there for a few turns, before falling back into the factories.
Despite the fact that the guns can set up in non-fortified factories by ITR special rules, I decided to fortify those locations anyway to give the gun crews extra protection. Also fortifed are factory hexes V2 and EE3.
The Game
Turn one saw the Japanese attack attack across a wide front, moving the LtMtrs into position to lay smoke. The forward Chineses troops caused some light casualties, and lost only a half squad (the Japanese declaring no quarter already!), the rest withdrawing in good order to better posistion. The Chinese HMG got a KIA on a Mtr squad in prep and things were going well.
Jim's Japanese attack got more agressive on turn two. The HMG squad broke and routed with the 9-1 back to the U1 factory. I lost the Chinese 8-1 when I exposed him to a bypass LOS I did not see. He was trying to go rally a broken squad, instead he was KIA on the way.
A broken Japanese half squd routed into the vacated HMG hex, thinking the concealed squad in X9 were dummies. They were not. That squad advanced in and killed the brokies in CC. They would recover the HMG in the following rally phase. Front still holding. Here's the situation at the end of turn two:
Some bad stuff happened on turn three as the Chinese center started to give way. The two armored cars on the left flank went down. One to a MA ordnance shot from it's enemy counterpart, the other to CC. The ART gun holding up the left flank inthe rear went boxcars on it's first shot, and then the manning crew was broken by sniper fire. Uh-oh.
Still, the U1 factory was looking like a tough nut, and the Japanese attack on the right was not especially strong. Still a fight at the end of three.

The turned left flank proved catastrophic on turn four. The Japanese kill stacks (a MMGx2 stack, and another FT squad) did damage in and around the U1 factory prep and and an armored car scooted around stop in the street and to cut rout paths out of the factory after surviving two Atr shots.
Over on the right we were still holding...barely

Turn five was a total cave in. There were lots of "failure-to-rout" deaths in the U1 factory, there were two Japanese squads running loose in the rear. When the advance fire shot from the flamethrower vaporised the last good order unit in U1, we called it a day.
Debacle at Sung Jiang is an interesting scenario because of the situation (1937 Sino-Japanese), and the toys. The Chinese cars with the twin 2FP MG turrets are unusual.
In the end though, Jim and I both agreed that it is pretty tough on the Chinese. We felt like neither side had remarkable good or bad luck, and although my play was far from perfect, it wasn't all that bad. Yet, it was all over two turns early, turning the scenario title into an accurate assessment of the battle.
End game situation:


1 comment:
Nice AAR - good use of end turn photos.
Post a Comment